 Save to Pinterest
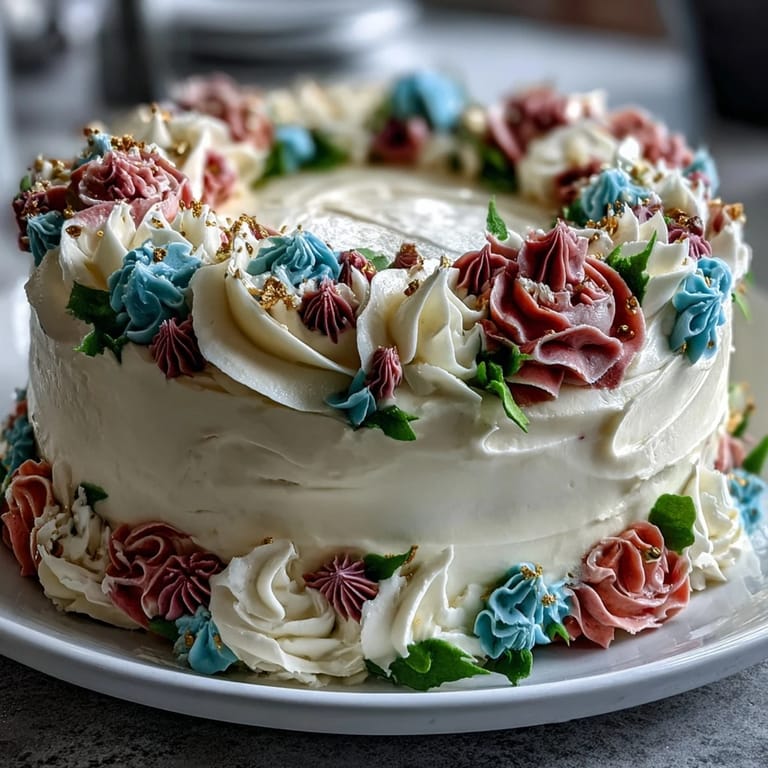
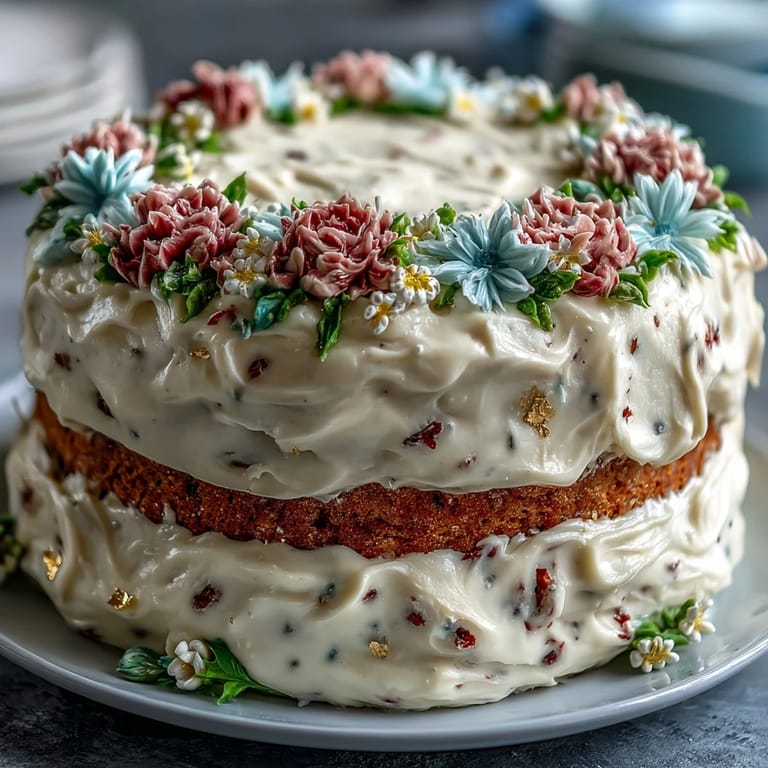
 My friend texted me three weeks before her graduation asking if I could bake her a cake—not just any cake, but one that celebrated both her May birthday and her big academic milestone. She's a Taurus through and through: grounded, determined, and deeply loyal to the people she loves. I decided on a three-layer vanilla cake with hand-piped floral buttercream, something elegant enough to feel like a proper celebration but approachable enough that the decorating process wouldn't stress either of us out. That afternoon in the kitchen, watching the butter and sugar cream into clouds, I realized this cake was less about impressing and more about showing up for someone in a way that mattered.
I'll never forget pulling the three layers out of the oven simultaneously—the smell of vanilla and caramelized butter filled the whole apartment. My partner leaned against the counter with coffee, half-watching as I crumb-coated and piped, and at one point asked, 'Are you sure you've never done this before?' I hadn't, but by then my hands had found their own language with the piping bag, muscle memory kicking in after the third rose petal. When my friend saw it the next day, she cried—not because it was perfect, but because it was honest.
Ingredients
- All-purpose flour (2 1/2 cups): The foundation of everything; make sure it's fresh and sifted out any clumps before measuring because even small lumps will affect the cake's crumb texture.
- Baking powder (2 1/2 tsp): This is your lift and lift alone, so don't skip it or reduce it—the cake needs this chemical reaction to rise properly and stay tender.
- Unsalted butter (1 cup for cake, 1 1/2 cups for frosting): Room temperature is non-negotiable here; cold butter will fight you during creaming and you'll end up with dense cake instead of fluffy layers.
- Granulated sugar (2 cups): This sweetens the cake and also aerates it when beaten with butter, so don't rush the creaming step.
- Eggs (4 large, room temperature): Cold eggs won't incorporate smoothly, so pull them out 30 minutes before baking; each egg should be added slowly so the batter stays emulsified.
- Vanilla extract (1 tbsp for cake, 2 tsp for frosting): Use pure vanilla, never imitation, because you'll taste the difference in every bite.
- Whole milk (1 cup, room temperature): The coolness or warmth of ingredients matters more than people think, so let your milk sit out on the counter while you prep everything else.
- Powdered sugar (5 cups for frosting): Sift it before adding to the butter or you'll have grainy frosting with lumps that no amount of beating will smooth out.
- Heavy cream or milk (2-4 tbsp for frosting): Add this gradually while beating because the consistency changes fast and you can always add more but can't take it back.
- Gel food coloring (various floral shades): Gel colors won't thin your frosting the way liquid colors do, which means you keep that perfect piping consistency while getting vibrant hues.
- Edible gold leaf or gold sprinkles (optional): If you're adding a Taurus symbol or graduation accent, this gives it that final touch of intention and celebration.
- Piping bags and assorted tips: Invest in a few good petal and leaf tips; cheap ones clog and frustrate, while good ones make the whole process feel natural.
Tired of Takeout? 🥡
Get 10 meals you can make faster than delivery arrives. Seriously.
One email. No spam. Unsubscribe anytime.
Instructions
- Set Up Your Oven and Pans:
- Preheat to 350°F and grease three 8-inch round pans, lining the bottoms with parchment paper—this step feels simple but it prevents the heartbreak of cake sticking. Make sure the oven rack is in the middle position so all three cakes bake evenly.
- Dry Ingredients Come First:
- Whisk together the flour, baking powder, and salt in a bowl, breaking up any tiny lumps you find. This distributes the leavening evenly through the dry mix so you don't end up with dense pockets in the finished cake.
- Cream the Butter and Sugar:
- Beat them together on medium speed for 3-4 minutes until the mixture looks pale, fluffy, and almost mousse-like. You're not just mixing; you're aerating, which is what gives the cake its tender crumb.
- Add the Eggs Slowly:
- Drop them in one at a time, beating well after each addition, because eggs need time to fully incorporate into the batter. If you rush this step, you'll see the mixture look slightly broken and grainy before it comes back together.
- Mix in the Vanilla:
- A single tablespoon goes a long way, and the smell that rises up is worth pausing for.
- Alternate Wet and Dry:
- Start with flour, then milk, then flour again, beating just until combined each time—overmixing at this stage develops gluten and makes the cake tough. The batter should look smooth and pourable when you're done.
- Divide and Smooth:
- Split the batter evenly among the three pans using an offset spatula, smoothing the tops so they bake level. Uneven pans lead to uneven cake layers, which makes frosting more complicated than it needs to be.
- Bake and Test for Doneness:
- Bake for 28-35 minutes until a toothpick inserted in the center comes out with just a few moist crumbs—not wet batter, but not completely dry either. Every oven is different, so start checking at 25 minutes.
- Cool in Pans, Then Fully:
- Leave the cakes in their pans for 10 minutes so the structure sets, then turn them out onto wire racks to cool completely. Frosting a warm cake is a losing battle, so patience here saves you heartache later.
- Make the Buttercream:
- Beat the softened butter until it's pale and creamy, then add the sifted powdered sugar gradually, beating well between additions. This prevents lumps and ensures a smooth, spreadable frosting.
- Add Vanilla and Cream:
- Mix in the vanilla extract and start with 2 tablespoons of cream, beating until fluffy, then add more cream as needed to reach the right consistency—too thick and you can't spread it, too thin and it won't hold shape.
- Tint Your Frosting:
- Divide the frosting into small bowls and add gel color a tiny bit at a time, stirring thoroughly because the color deepens as you mix. Floral shades like sage green, dusty pink, and soft purple work beautifully together.
- Level and Layer:
- If your cake layers domed slightly, use a serrated knife to level the tops so they sit flat, then place the first layer on your serving plate and spread with frosting. Repeat with the remaining layers, checking that everything is level as you build.
- Apply the Crumb Coat:
- Spread a thin layer of frosting all over the cake to seal in crumbs, then pop it in the fridge for 20 minutes—this step makes the final frosting look polished instead of shaggy.
- Final Frosting Layer:
- Once chilled, apply a smooth, thicker coat of your base frosting color, using an offset spatula or a cake turntable to make the sides and top even. Step back and admire this moment before moving to decoration.
- Pipe Your Flowers and Leaves:
- Load your piping bag with a petal tip and one color, then practice a few petals on parchment before committing to the cake—once you find your rhythm, pipe roses, peonies, or wildflowers around the cake. Add greenery with a leaf tip and different frosting, building layers of color and texture.
- Add Your Special Touches:
- If you're celebrating both a birthday and graduation, add edible gold leaf or sprinkles to highlight a Taurus symbol or graduation cap detail. These final accents make the cake feel intentional and personalized.
- Chill Before Serving:
- Keep the finished cake in the fridge until it's time to serve, which keeps everything from melting and gives the frosting time to set. Bring it to room temperature for about 20 minutes before slicing so the flavors shine.
 Save to Pinterest
 A week after my friend's celebration, she sent me a photo of herself holding a slice of the leftover cake, grinning in her graduation cap. That's when I understood that baking for someone isn't about technical perfection—it's about the hours you spend thinking about what would make them feel seen, and then putting your hands to work making that real.
Why Three Layers Matter
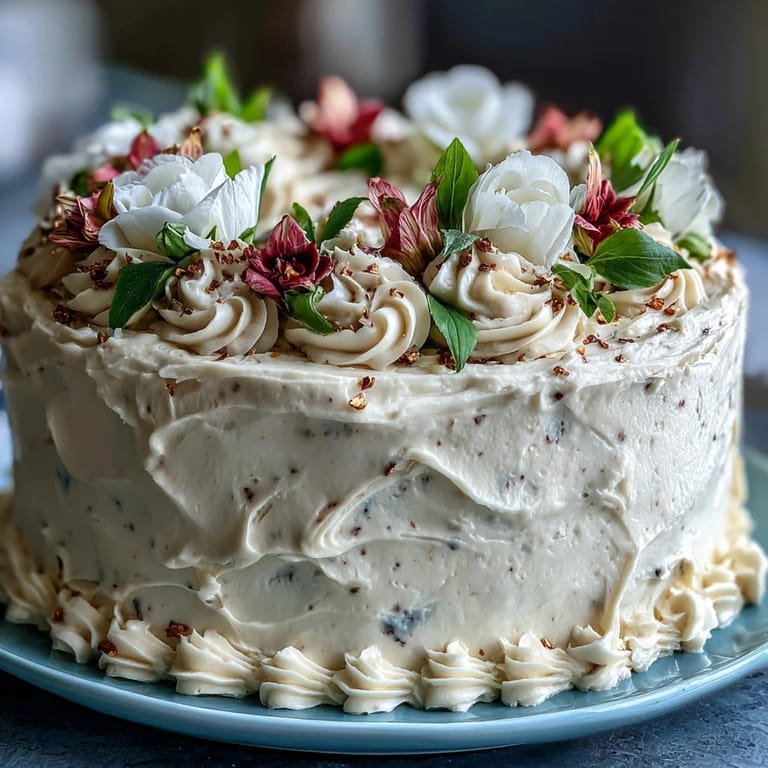
Three layers create visual drama and substance that a two-layer cake simply can't match, and they force you to really commit to the decorating process in a way that makes the final cake feel special. The height also gives you more surface area for those floral designs, so you have room to play and experiment without crowding.
Personalizing for Your Guest
Matching your flower colors to the graduate's school colors or adding birth flowers for their zodiac sign turns this cake from beautiful to deeply personal. I used sage green, blush pink, and soft lavender because my friend loves those colors, and watching her recognize herself in the cake made every minute of piping feel worth it.
Storage and Make-Ahead Tips
You can bake the layers up to two days ahead and wrap them tightly in plastic wrap, and you can make the buttercream the morning of serving. For the decorating itself, you can pipe flowers onto parchment the day before, chill them, and then transfer them to the cake right before serving if you want to remove some of the pressure.
- Unfrosted cake layers keep beautifully in an airtight container on the counter for two days or in the freezer for up to a month.
- Piped buttercream flowers can be made ahead and stored in the fridge on parchment, then gently transferred to the finished cake.
- The assembled, frosted cake stays fresh for three days in the fridge and actually tastes better on day two when the flavors have settled.
 Save to Pinterest
 This cake is the kind of project that looks intimidating from the outside but unfolds beautifully once you commit to it, layer by layer. Make it for someone you want to celebrate, and you'll create a memory that tastes as good as it looks.
Recipe Questions & Answers
- → How do I achieve smooth buttercream for piping floral designs?
Beat the buttercream until creamy and fluffly, then chill it briefly before piping. This ensures stability and smooth flow from the piping bags.
- → Can I prepare this cake in advance?
Yes, baking and cooling can be done a day before decorating. Keep layers wrapped to retain freshness until assembly.
- → What type of milk can be used in the batter?
Whole milk is recommended for richness, but alternatives like 2% or plant-based milk can be substituted with minor texture changes.
- → How to prevent the cake from drying out?
Ensure not to overbake and wrap cooled layers tightly. The buttercream also acts as a moisture barrier between layers.
- → What tools are necessary for floral buttercream piping?
Use piping bags fitted with petal, leaf, and round tips to create various flower and foliage shapes effectively.